


Our focus in this article will be to explain how to prepare your nails properly and apply your gel nails so that they look the best that they can.
Gel nails can look amazing if they’re done to professional standards, but the majority of us aren’t able to afford the regular maintenance that comes with them. This is why it’s worth looking into doing it yourself, however, to prevent your work from looking somewhat tacky, you have to get it perfect. In this article, we’ll be showing you how to prepare your nails, apply the necessary coats, and make your gel nails look like perfection.
What to Avoid
Preparing your gel nails for the first time can be exciting and even though you might feel tempted to get through it as fast as possible so that you can gloat about your creation, you shouldn’t. There are a couple of things that you should be aware of which you need to avoid:
- After applying each of the coats, as tempting as it might be, don’t touch your nails even after the coat has dried until the final coat has been added. Given that each of the products that you’ll be using are designed so that they stick to each other, if you touch the unfinished application then you’ll leave a sticky fingerprint mark on the nail.
- Don’t rush to get it complete in time. Make sure that you have plenty of time to sit down, concentrate, and take your time when applying gel nails. It might not be the most exciting task but in the end, it’s worth taking the extra time.
These two minor, yet significant, things will make sure that your nails come out the way that you expect them to.
What You’ll Need
Before you get started, make sure that you have the following equipment at the ready.
- Manicure Stick
- Nail File
- Nail Lamp
- Gel Cleanser
On top of these essentials, you’ll also need to get your hands on a base coat, gel primer, and your choice nail polish. Once you have all of these things on your table and you’re ready to begin, dive right in.
Preparing Your Nails
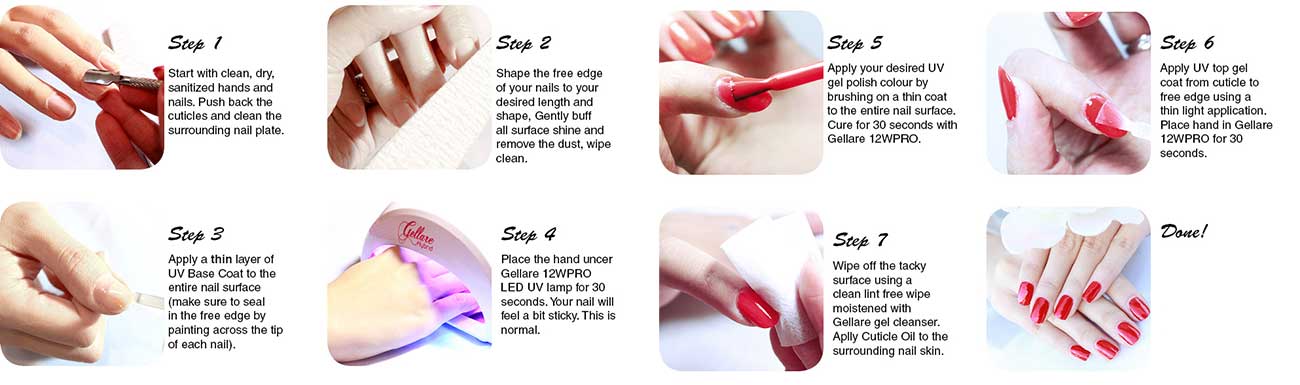
The first thing that you have to prepare your nails. Start by thoroughly washing your hands, specifically your fingertips, so that any dirt is removed from the surface. Now that we have clean nails to work with, the next thing you want to do is shape your nails. It’s important to remember that you can’t reshape your nails after applying the gel nails – if you attempt to reshape, you’ll most likely chip the nail polish and you’ll have put in all of this work for nothing.
If your nails are difficult to work with them try putting your hands in warm water for a couple of minutes; this will make them slightly softer and easier to shape. Take your nail file and file each of your nails into the shape that you want them to be.
Now, it’s very important that you’re patient when shaping your nails. A lot of women are tempted to vigorously file away so that they can show off their nails as soon as possible, but you must take your time. When filing, use a single motion method, filing only once per stroke. This will prevent you from making any mistakes such as filing away too much of the nail as well as allowing you to accurately shape your nails exactly as you want them.
After taking the time to file and shape your nails accordingly, wash your hands with warm water again to remove any of the nail dust from the surface.
Gel Primer and Base Coat
Now that you’ve prepped your nails, it’s time to apply the primer and the base coat. Starting with the nail primer, apply a thin layer to your nail and allow it to air dry. As tempting as it may be, don’t place your hand under a nail lamp to speed up the drying process when it comes to primer – this will actually extend the time that it takes to dry, and it only takes about 30 seconds for the primer to air dry anyway. Repeat this with each finger until you’re happy to continue.
The last thing to do before adding a personal touch to your gel nails is to apply a base coat. Take your time to apply a base coat as it takes slightly longer to dry than the nail primer and if you make a noticeably rush job of it, your nails will look significantly worse than if you were to take those extra few seconds. When you apply the base coat to your nails, slowly coat around the edges of your nails (without touching your skin) as well as adding a thin coat to the tip of your nails. This thin coat will add an extra level of strength to your nails and will minimize the risk of them chipping.
If you notice that there are streaks in the base coat after you apply it, don’t worry. These lines will disappear after a few seconds as the liquid levels out and shapes around your nails.
After you have the base coat prepared on one hand, place it under your nail lamp for about 20 seconds before repeating this process with the other hand.
Applying Your Nail Polish
The moment that you’ve been waiting for – it’s time to add the nail polish and get creative. You can go with a straightforward pink, or perhaps you want to paint a unique pattern to stand out from the crowd. Whatever you choose, when applying the nail polish of your choice coat your nails in the same manner as the base coat, making sure that you thinly apply it to the tips of your nail as well.
Once you’ve finished one hand, place it under your nail lamp for a little longer than before, around 30 seconds, before repeating it on your other hand. Depending on the shades that you’ve used and what colour you applied, you might want to add another coat of nail polish which is completely fine to do – simply repeat the process on each hand.
The Final Coat
When you’re happy with your nail polish the final thing that you have to do is apply a top coat. Some people choose not to do this although by adding this top coat, you are significantly extending the lifespan of your gel nails and making them stronger to prevent cracking or chipping.
Apply the top coat in the same manner that you did the base coat and place your hands under the nail lamp for about 20 seconds. Lastly, after a few minutes to ensure that the top coat has dried properly, take your gel cleanser, add a few drops to a piece of kitchen roll, and wipe it on your nails to remove the sticky residue.
To Conclude…
That’s it! Now that you’ve followed our guide on how to apply gel nails you can show off your hard work to your friends and family, and even help them to style their nails as beautifully as your own. Provided that you take your time and strictly follow our instructions, your nails will be perfection.