
The best way to connect karaoke to a phone or tablet is to keep the mobile device as the music source only, then send that audio into one karaoke control point such as a karaoke speaker, mixer, amplifier, or receiver. A wired connection is usually the safest choice for lower delay and more stable singing, while Bluetooth is better for quick casual use but more likely to create timing problems.
Written by Toan Ho — Tittac editorial team.
Who this guide is for: Home karaoke users who want to play karaoke from a phone or tablet without creating audio delay, unstable Bluetooth playback, wrong-input confusion, or a setup that feels different every time.
How this guide was prepared: This guide was refreshed around common home karaoke setups that use phones, tablets, Bluetooth, wired audio, karaoke speakers, mixers, receivers, TVs, and wireless microphones.
A phone or tablet can be one of the fastest ways to start karaoke at home. You can search songs quickly, open YouTube or a karaoke app, and control playback from your hand. The problem is that mobile karaoke can become messy when the phone is asked to do too many jobs at once.
The cleanest setup usually gives each device one clear role. The phone or tablet provides the music. The karaoke system handles the microphones and final sound. The speakers play the finished mix into the room. If you want the larger system framework first, start with the Step-by-Step Home Karaoke Setup Guide.
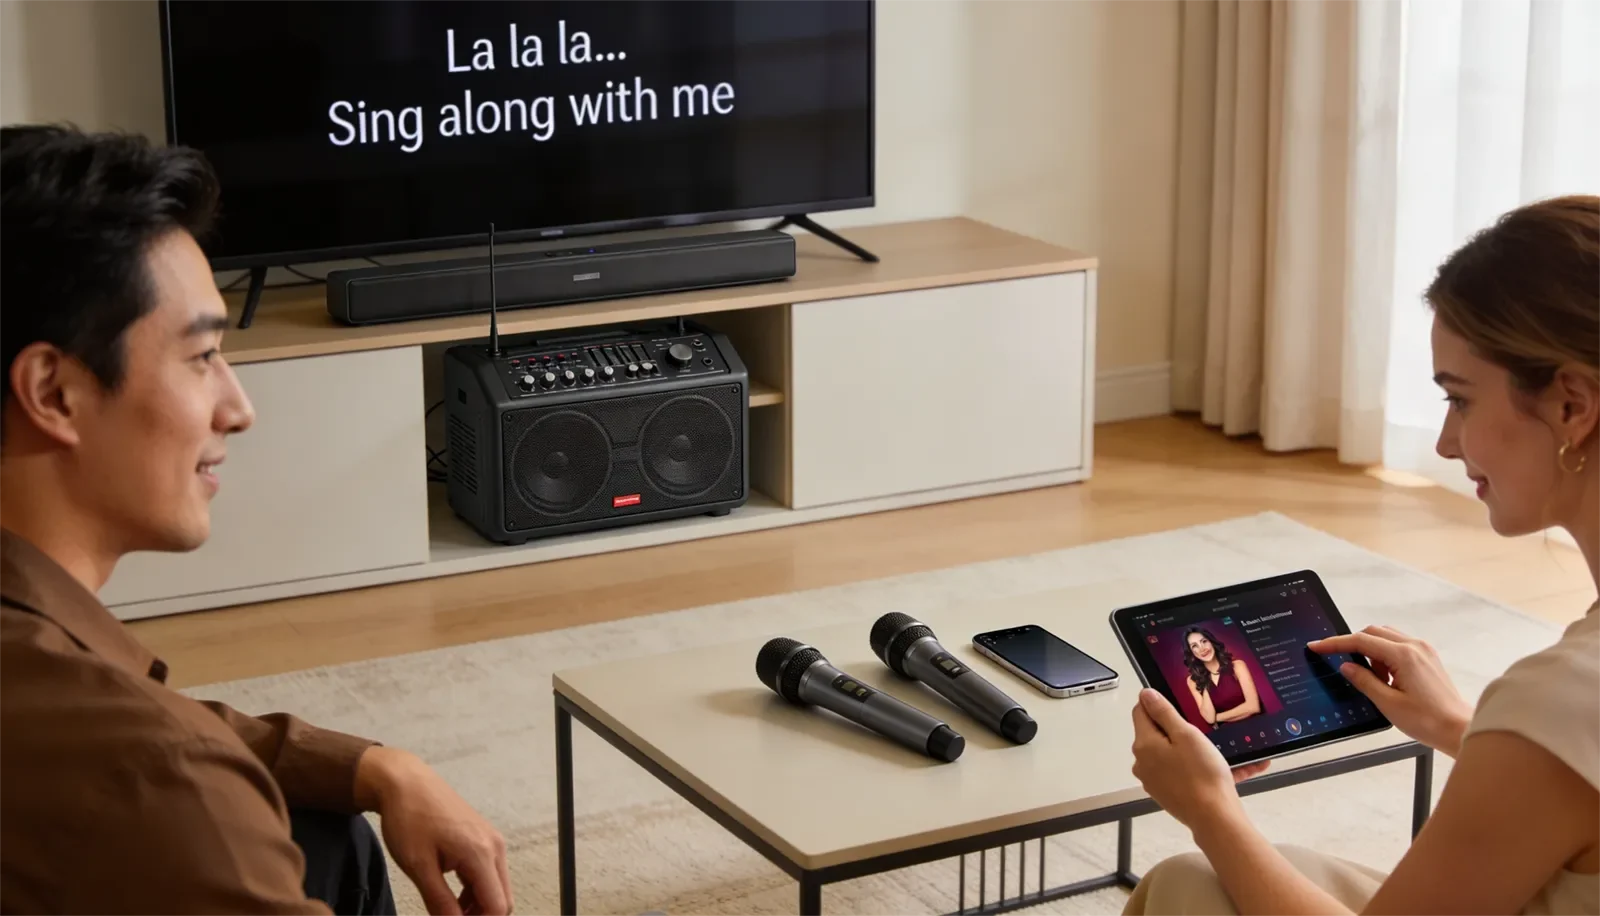
Table of Contents
Quick Answer
For most homes, connect karaoke to a phone or tablet by using the mobile device as the music source, sending its audio into the karaoke speaker, mixer, amplifier, or receiver, then testing music before turning on microphones. Use one connection path at a time. A wired connection is usually more stable and has less delay. Bluetooth is more convenient, but it can cause timing drift, pairing problems, or a disconnected singing feel.
The key is not to connect the phone everywhere. The key is to send the phone into one karaoke control point and let the karaoke system handle the live singing side.
Best Connection Path for Most Homes
For most home karaoke users, the best connection path is simple: phone or tablet to karaoke system, microphones to karaoke system, karaoke system to speakers. This keeps the music and vocals meeting in one place before the final sound reaches the room.
This matters because the phone is usually best at choosing songs, loading apps, and controlling playback. It is not usually the best place to manage microphone volume, echo, vocal tone, speaker output, and room balance.
In a clean setup, each device has a clear job:
- Phone or tablet: plays the karaoke track, YouTube video, or karaoke app.
- Karaoke system: receives the music, handles microphones, and controls the mix.
- Speakers: play the final sound in the room.
That setup is easier to repeat, easier to explain to family members, and easier to troubleshoot when something goes wrong. It also prevents the common problem of having the phone, TV, Bluetooth device, and karaoke unit all fighting to become the main source.
If your main goal is a larger screen for lyrics, the setup may need to become more TV-centered. In that case, read Ultimate YouTube Karaoke Setup Guide.
Wired vs. Bluetooth for Phone Karaoke
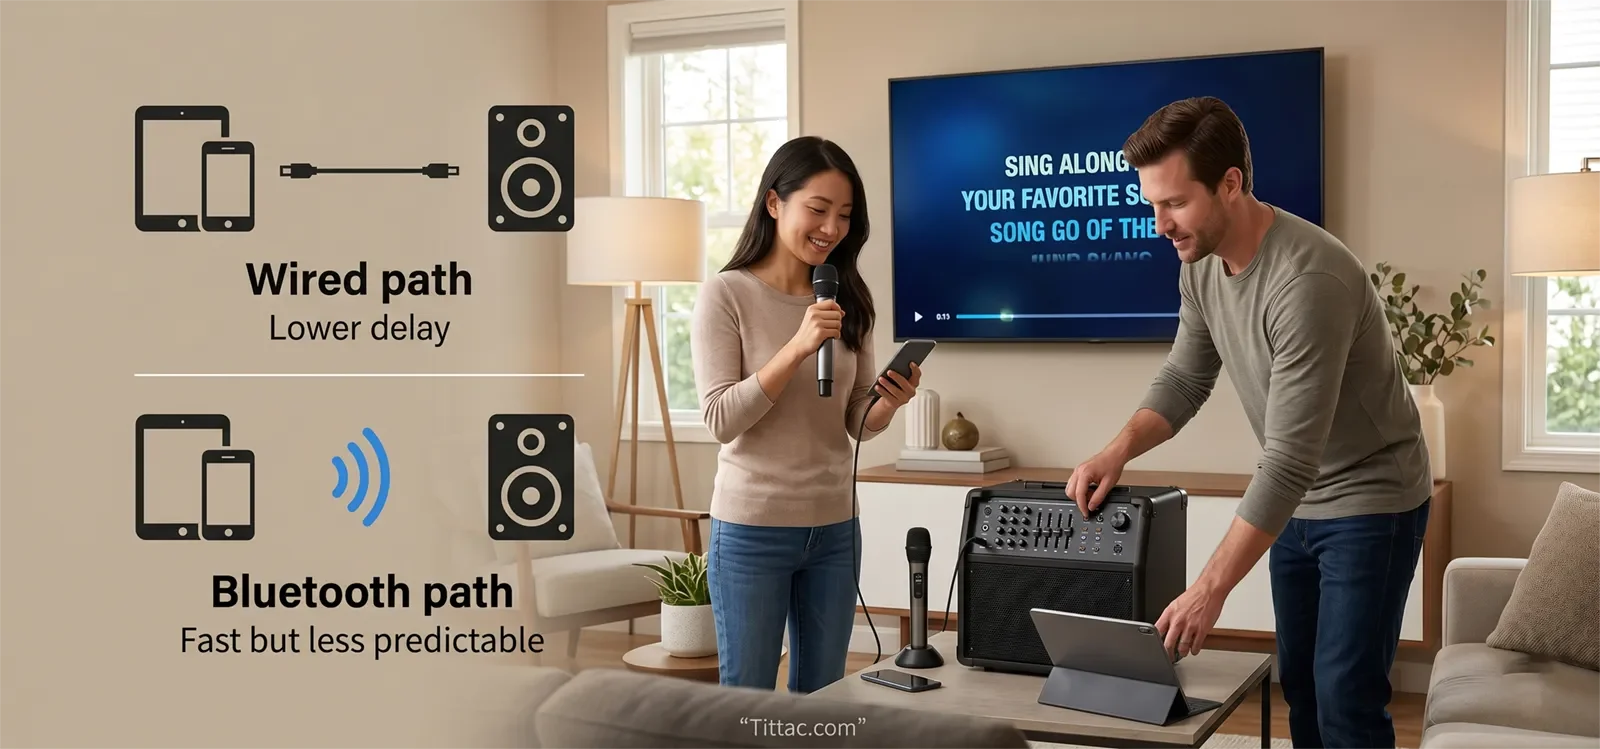
A wired connection is usually the safer default for home karaoke because it is more predictable. It reduces pairing problems, random dropouts, and delay between the music and the singer’s voice. If the karaoke system supports a direct audio input, wired audio is often the best place to start.
A wired path makes the most sense when you want:
- Lower delay for singing in time.
- A more stable connection for regular home use.
- Easier troubleshooting when something sounds wrong.
- A repeatable setup that family members can use without guessing.
Bluetooth is more convenient. It is useful for portable karaoke speakers, casual singing, small rooms, and quick sessions where cable clutter matters more than perfect timing. But karaoke is more sensitive to delay than normal music listening. A Bluetooth connection that feels fine for background music can still feel slightly late or disconnected when someone sings.
Bluetooth makes more sense when you want:
- A fast casual connection.
- Less cable clutter.
- A portable setup.
- Simple playback where perfect timing is not the top priority.
If Bluetooth already feels delayed or unnatural while singing, do not keep changing mic controls first. The better next step is Fixing Bluetooth Audio Delay in Karaoke.
Using a Phone or Tablet With a TV
Some home users want the phone or tablet for song control and the TV for lyrics. That can work, but it needs a clear signal path. The most common mistake is sending audio one way while video or another device creates a second active path.
For example, if the phone sends audio to the karaoke speaker by Bluetooth while the TV also plays sound through another output, the room may feel out of sync. The singer may hear timing differences between the phone, TV, karaoke system, and speakers.
If you want lyrics on the TV, decide whether the TV is only a display or whether it is part of the audio path too. Mixing those roles without a plan is where many home karaoke problems begin.
If your setup is mainly TV-based, use the phone only as a helper or controller and follow a TV-first connection plan. For that path, read How to Connect a Karaoke System to a Smart TV.
Step-by-Step Connection Order
Start by deciding the phone or tablet’s role. For most homes, the best role is simple music source. Do not make it the source, screen, mixer, and troubleshooting center all at once.
Next, choose one audio path. Use either wired audio or Bluetooth, not both at the same time. One clean route is easier to test than several half-active routes.
Connect the phone or tablet to the karaoke speaker, mixer, amplifier, or receiver. At this stage, test music only. Do not turn on microphones yet. First confirm that a song from the phone reaches the karaoke system clearly.
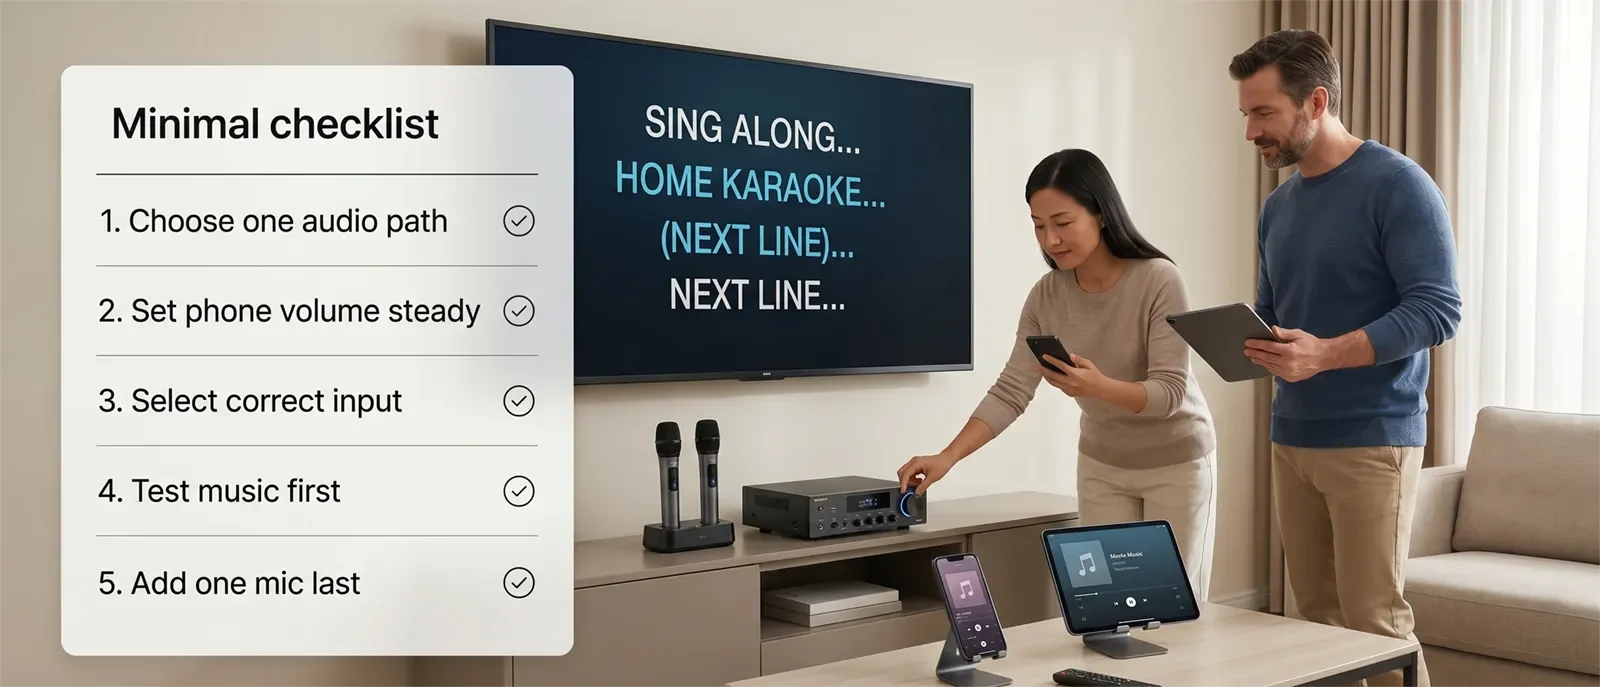
Then check the karaoke system input. Many “no sound” problems happen because the phone is connected correctly but the karaoke unit is listening to the wrong input. Make sure the input selector matches the connection you are using.
After music works, confirm the final speaker output. If the phone shows that it is playing but the room is silent or weak, the issue may be after the karaoke system, not at the phone.
Add microphones last. Start with one microphone, test voice level, then add the second microphone if needed. This order keeps the setup clear: source first, input second, speaker output third, microphones last.
Settings to Check
Set the phone or tablet volume to a steady level before adjusting the room volume. If you keep changing both the phone volume and karaoke system volume at the same time, it becomes harder to know which control is causing the problem.
Check the input selection on the karaoke device. Systems with Bluetooth, AUX, optical, HDMI, USB, or multiple line inputs can easily be set to the wrong source. Before replacing cables or changing apps, confirm the input first.
If you are using Bluetooth, test the real singing feel, not just whether music plays. Ask whether the singer feels connected to the track. If the timing feels late, the Bluetooth path may be the problem.
Keep the phone or tablet focused during karaoke. Low battery, notifications, background apps, and constant switching can make playback less stable. During a session, the mobile device works best when it acts like a dedicated source.
Also check that the karaoke app, YouTube volume, phone volume, and karaoke system input level are not fighting each other. A stable source level makes the rest of the system easier to balance.
Common Mistakes
The biggest mistake is overcomplicating the setup too early. Many users turn on Bluetooth, screen mirroring, TV sound, receiver inputs, and microphones before confirming that the phone can send clean music to the karaoke system.
Another common mistake is adding microphones before the music path works. If the music source is not stable yet, microphone testing only adds more confusion.
People also try to fix Bluetooth delay by changing echo, mic volume, or speaker tone. Those controls may affect the vocal sound, but they usually do not fix source delay. If the music arrives late, the connection path needs attention first.
Use this faster fix order:
- Confirm the phone or tablet plays the content normally.
- Confirm only one audio path is active.
- Confirm the karaoke system is on the correct input.
- Confirm music reaches the speakers before testing microphones.
- Compare Bluetooth with a wired path if timing feels wrong.
- Add one microphone and test again.
In most homes, the shorter and clearer path wins. A simple setup usually sounds better, feels more stable, and is easier for everyone in the family to use.
Conclusion
A phone or tablet can work very well for home karaoke when it has one clear job: provide the music. The karaoke system should handle the microphones, mixing, and final sound. That separation keeps the setup cleaner and reduces delay, wrong-input problems, and wireless confusion.
For the most stable result, start with one connection path, test music before microphones, and keep the system easy to repeat. Once the mobile connection works, you can build the rest of the room setup with more confidence.
FAQs
Can I use any phone or tablet as a karaoke source?
In many cases, yes. The important part is whether the device can play your karaoke content clearly and connect to the karaoke system in a stable way.
Is Bluetooth good enough for karaoke at home?
Bluetooth can be good enough for casual karaoke, especially with portable speakers. For more stable timing and regular home use, a wired connection is usually the better starting point.
Should I connect my phone to the TV or the karaoke system?
If you only need music audio, connect the phone to the karaoke system. If you need lyrics on a larger screen, decide whether the TV is only displaying lyrics or also sending audio. Avoid creating two active audio paths at once.
Why does my phone connect but the karaoke system has no sound?
The most common reasons are wrong input selection, low source volume, Bluetooth pairing to the wrong device, or the final speaker output not being active.
Why does karaoke feel delayed when I use my phone?
Delay often comes from Bluetooth, screen mirroring, or routing audio and video through different paths. Try a simpler wired path or reduce the number of devices involved.
If you want the full home karaoke setup to stay easy to connect, repeat, and troubleshoot, start with the complete setup path.


