
YouTube is one of the easiest ways to run karaoke at home, but a good YouTube karaoke setup is not just about opening a video and pressing play. This guide is for home users who want a setup that feels simple in real life: lyrics that are easy to read, microphones that are easy to control, and a signal path that does not keep creating delay, weak vocals, or connection confusion.
The goal here is not to build the most complicated system. The goal is to build a YouTube karaoke setup that is clear, stable, and easy to use again and again. If you want the broader home setup framework before focusing on YouTube, start with the Step-by-Step Home Karaoke Setup Guide.
Quick Answer: For most homes, the best YouTube karaoke setup is YouTube on the TV, TV audio routed cleanly into the karaoke system, and microphones connected directly to the karaoke system. That gives you the easiest lyric viewing, better vocal control, lower real-world delay, and a cleaner daily workflow than trying to make the TV handle the singing side of the system.
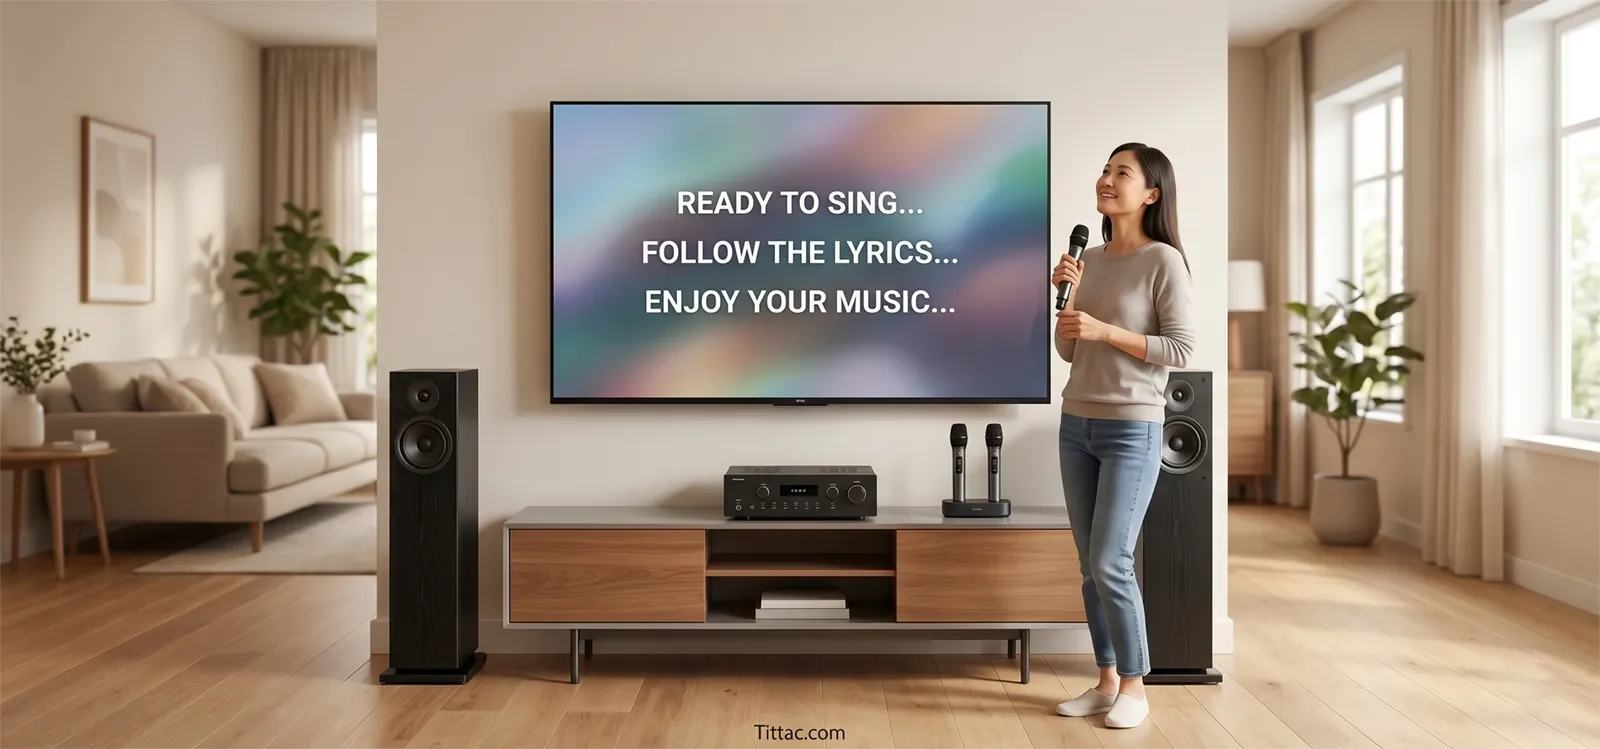
Table of Contents
What you need and the key setup context
A good YouTube karaoke setup has five jobs to cover: show lyrics clearly, play the music cleanly, mix microphones properly, give you basic vocal control, and stay easy to use when people are actually taking turns singing. Most home problems start when one of those jobs gets pushed onto the wrong device.
At minimum, most YouTube karaoke setups need a video source, a screen, a karaoke control point, microphones, and a final speaker output. The exact hardware can vary, but the roles stay the same:
- Video source: a Smart TV app, streaming device, phone, or tablet running YouTube.
- Screen: usually a TV, because lyrics are easier to read from across the room.
- Karaoke control point: your karaoke mixer, karaoke speaker, amplifier, or powered system that combines music and microphones.
- Microphones: ideally connected to the karaoke system, not to the TV.
- Speaker output: the device that actually fills the room with music and vocals.
The most important context is this: YouTube is only the song source. It is not the part of the system that should manage the singing experience. Your TV is there to display lyrics. Your karaoke system is there to handle the live vocal side. Once you keep those roles separate, setup decisions become much easier.
Three source styles are common in home YouTube karaoke:
- TV-based: YouTube runs on the Smart TV or a device connected to the TV. This is the easiest format for most homes because the lyrics are large and the setup feels natural for groups.
- Streaming-device-based: YouTube runs on a Fire TV, Apple TV, Roku, Chromecast, or similar device. This often feels smoother than relying on a TV's built-in app menu.
- Phone or tablet based: YouTube runs on a mobile device, either feeding audio directly to the karaoke system or casting to the TV. This is convenient, but it is usually less comfortable for group singing unless the screen ends up on the TV.
For most homes, the best default is still TV-first viewing with the karaoke system doing the audio mixing. That approach tends to win on clarity, stability, lower delay, and easier daily use.
The simplest signal path for most homes
The simplest signal path for home YouTube karaoke is also the one that causes the fewest problems:
- YouTube plays on the TV or on a device feeding the TV.
- The TV sends music audio to the karaoke system.
- The microphones connect directly to the karaoke system.
- The karaoke system mixes music and vocals together.
- The final sound comes from the karaoke speakers or the main karaoke output.
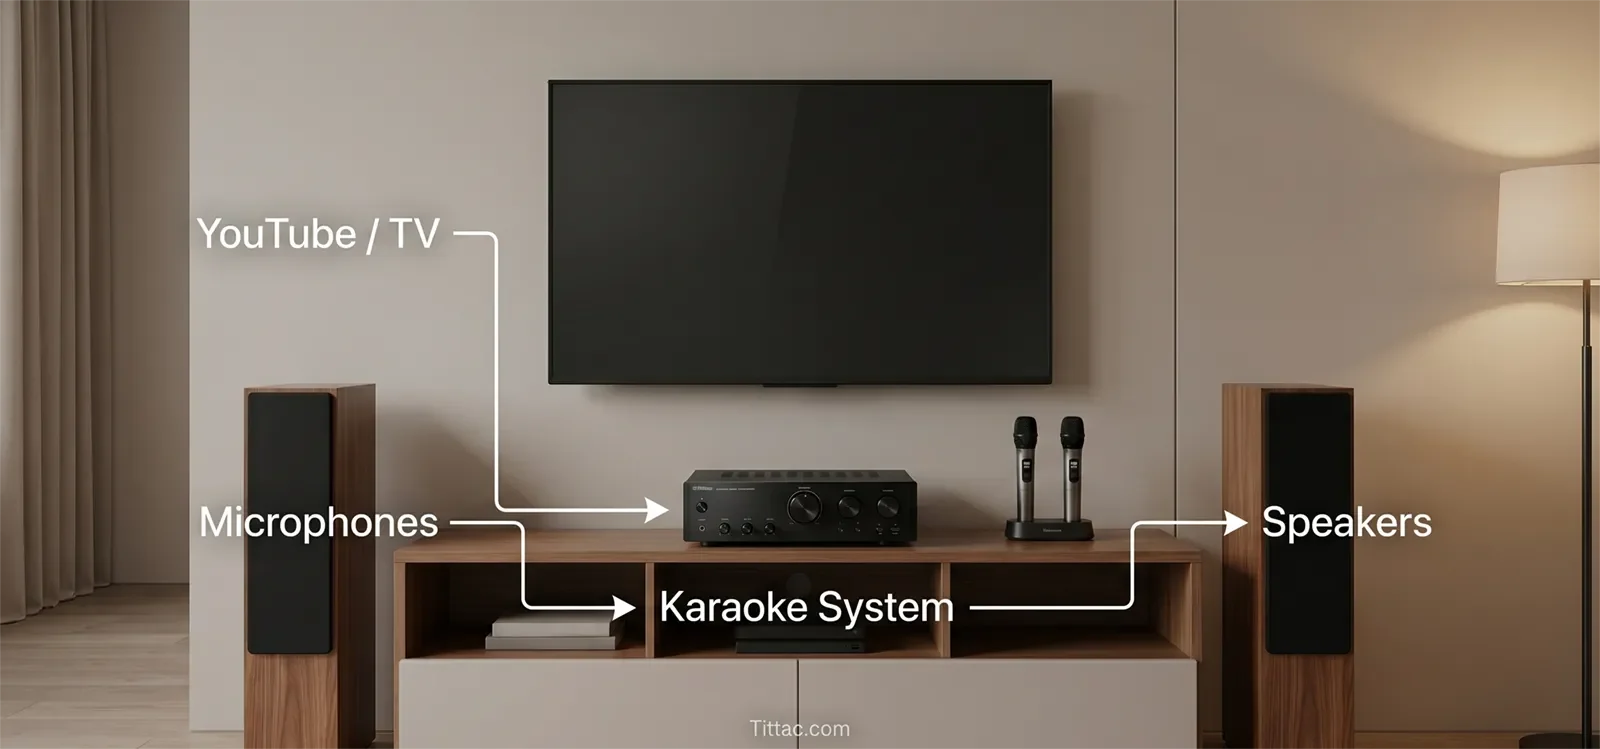
This layout works because it keeps one main audio control point. Instead of splitting the music in one direction and the microphones in another, it lets the karaoke system do the karaoke job. That makes mic level, echo, vocal balance, and final output much easier to manage.
In many homes, this exact workflow is the most practical long-term pattern because it feels familiar, clean, and easy to repeat. If your setup is centered around TV lyrics, wireless mics, and simple home use, the best next example is Karaoke Setup for TV + YouTube + Wireless Microphones.
What usually causes trouble is trying to let the TV do too much. TVs are great at display and general media playback, but they are rarely the best place to manage microphone mixing, singing effects, or live vocal balance. Once microphones are treated as an afterthought, you often end up chasing weak vocals, harsh timing, or inconsistent volume.
The main rule is simple: let the screen show the song, and let the karaoke system handle the singing. That structure is usually the cleanest path to lower feedback risk, better vocal presence, and a more stable setup.
Step-by-step connection order
The safest way to build a YouTube karaoke setup is one stage at a time. That makes it easier to find mistakes early instead of changing five settings at once and not knowing what actually fixed the problem.
1. Choose your YouTube source
Start by deciding where YouTube will run. For most homes, that should be the TV itself or a device connected to the TV. A phone or tablet can still work, but it is usually a convenience choice rather than the best long-session choice for family karaoke.
2. Confirm the lyrics display first
Before you think about microphones, make sure the screen side works. Open a YouTube karaoke track and confirm the lyrics are easy to read from the normal singing position. If people will be standing farther away, this matters more than it seems.
3. Route the music into the karaoke system
Once the screen is working, connect the TV audio output to the karaoke system. At this stage, your only goal is to confirm that music from YouTube reaches the karaoke system clearly. Do not add microphones yet. First confirm the music path on its own.
If you are still deciding how the TV should send audio, the practical support article to compare those paths is HDMI vs Optical for Karaoke Systems.
4. Connect the microphones directly to the karaoke system
After the music path is confirmed, connect one microphone to the karaoke system and test it by speaking, not singing. This makes balance issues easier to hear. Once the first mic works cleanly, add the second microphone if needed.
5. Keep one main output path
Send the final mixed sound from the karaoke system to the speakers you actually plan to use. Avoid situations where one device is playing music while another device is handling vocals somewhere else. One controlled output path is easier to balance, easier to troubleshoot, and usually sounds more natural.
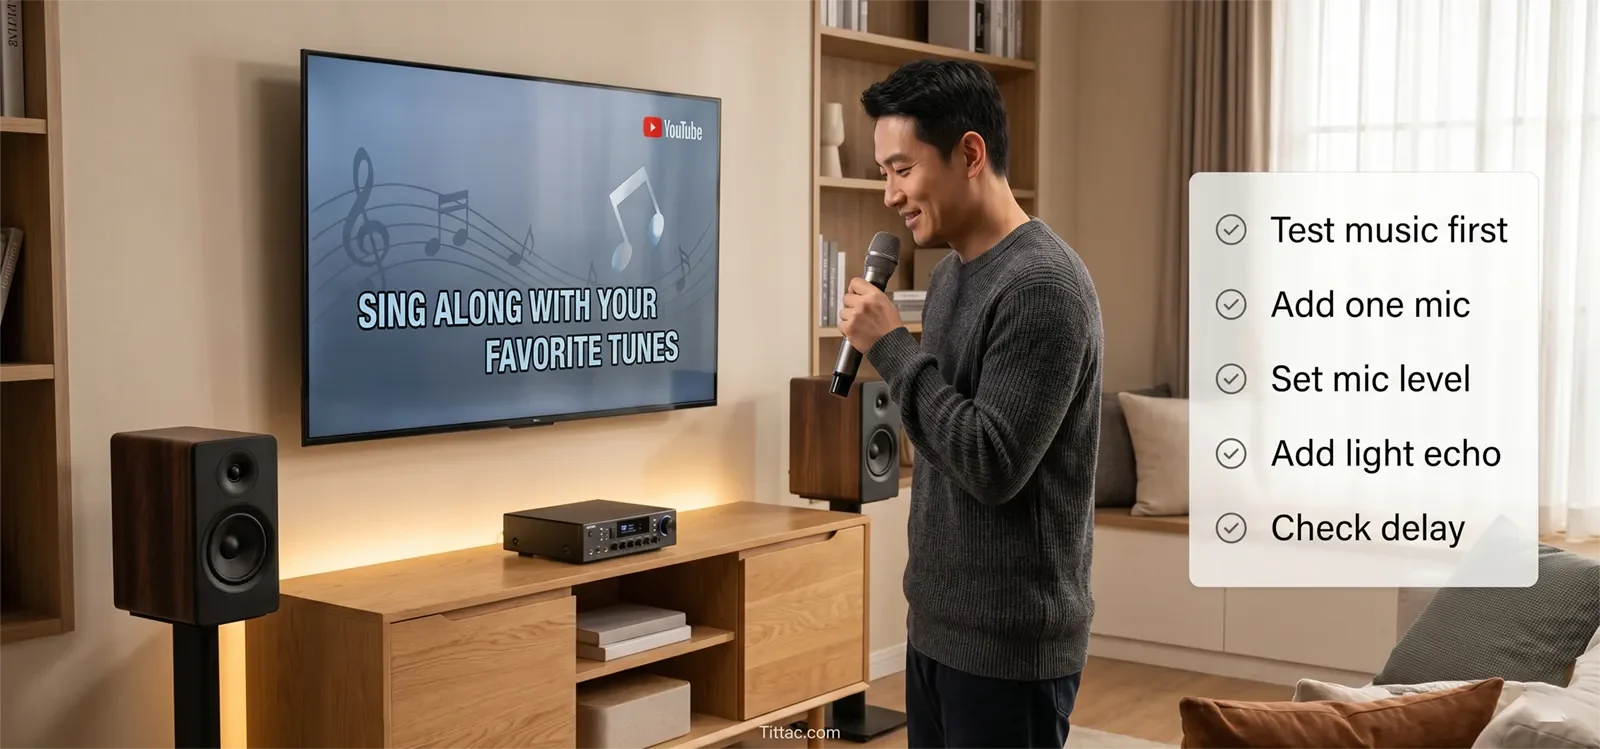
6. Test a real song before you call the setup done
At this point, run one familiar karaoke video from start to finish. Watch for three things: whether the lyrics are easy to read, whether the music feels locked to the screen well enough for singing, and whether the vocals sit clearly over the track without sounding buried or harsh.
For most homes, this connection order works better than jumping straight into advanced settings because it builds stability first. That matters more than fancy tweaks. A setup that is clear and repeatable is usually better than one that looks more advanced on paper but keeps creating delay or control issues.
First sound check and tuning
Your first sound check should be short and practical. The goal is not to chase perfect studio sound. The goal is to make the setup feel clean, comfortable, and easy to sing through at home.
Start with music first
Play a familiar YouTube karaoke track and set the music to a comfortable level before you bring up the microphones. This helps you hear the room honestly. If the music already sounds thin, harsh, or oddly delayed, fix that first. Do not try to solve a music-path problem by changing microphone controls.
Bring up one microphone at a time
Raise the mic level until words are clearly heard above the song, but stop before the voice starts sounding strained or the room starts reacting. For many homes, the cleanest vocal result comes from moderate mic level plus sensible speaker placement, not from pushing the mic harder and harder.
Add echo lightly
A small amount of echo or reverb can make home singing feel smoother, but too much effect usually hurts timing and lyric clarity. With YouTube karaoke especially, heavy effects can make an already slightly processed signal feel more disconnected. Start lighter than you think you need.
Watch for real-world delay, not theoretical delay
Not every small lag is equally noticeable. What matters is whether the singer feels disconnected from the song. If timing feels off, look at the real path: source, TV, audio routing, and sound settings. In many homes, the best fix is simplification, not more tweaking.
Correct placement before heavy control changes
If you hear the start of feedback or the voice feels unstable, change placement before you reach for more drastic EQ-style thinking. Move microphones farther from speakers, avoid aiming speakers directly at the mic position, and keep the singing position realistic for the room. That usually gives a cleaner result than trying to “fix the room” with random control changes.
The best first sound check usually ends with a setup that feels easy, not dramatic: vocals are clear, music is steady, timing feels comfortable, and the system still sounds relaxed at normal home volume. That is the right target for most homes.
Reusable checklist
Use this checklist anytime you set up YouTube karaoke at home:
- Confirm where YouTube is running: TV, streaming device, phone, or tablet.
- Make sure the lyrics are easy to read from the real singing position.
- Confirm the TV or source is sending music to the karaoke system.
- Test music alone before adding microphones.
- Connect one microphone first, then add the second after the first is stable.
- Keep music and microphones meeting at the karaoke system, not across separate paths.
- Set music level first, then vocal level, then light echo if needed.
- Listen for delay, weak vocals, or feedback before guests arrive.
- Use one full test song, not just a few seconds of audio.
- Leave the final setup simple enough that someone else in the house could repeat it.
A reusable routine matters because home karaoke is not just about one successful night. The setup should still be easy next week, next month, and whenever family or friends want to sing again. The best home system is usually the one people can run without stress.
Conclusion
For most homes, the best YouTube karaoke setup is the one that keeps each device doing the job it handles best: the TV shows the lyrics, the source provides the song, and the karaoke system manages the microphones and the final sound. That is usually the most practical path to clearer vocals, fewer connection problems, lower perceived delay, and easier daily use.
If you are deciding between multiple ways to do it, choose the structure that feels simplest to repeat. A setup that is stable, understandable, and easy to troubleshoot will almost always serve a home better than one that is more complicated but harder to live with. In real home karaoke, clarity and consistency matter more than showing off a more elaborate signal chain.
Frequently Asked Questions
Is a Smart TV enough for YouTube karaoke by itself?
A Smart TV is often enough to display YouTube karaoke well, but it is usually not enough to manage the full singing experience by itself. For better control, the TV should handle the screen side while the karaoke system handles microphones, vocal balance, and the final mixed sound.
Is a phone or tablet a good long-term YouTube karaoke source?
A phone or tablet can work very well for quick sessions, smaller rooms, or more portable setups. For long-term home use, though, most families prefer lyrics on the TV because it is easier to read, easier to share, and usually feels more natural for group singing.
Why do YouTube karaoke setups often feel delayed?
Delay usually comes from the full signal chain rather than from YouTube alone. The source device, TV processing, audio connection path, and sound settings can all add up. In many homes, the most effective fix is simplifying the route and keeping the karaoke system as the main audio control point.
Should microphones connect to the TV or to the karaoke system?
For most home karaoke setups, microphones should connect to the karaoke system. That gives you better control over mic volume, echo, vocal balance, and overall stability. Connecting microphones to the TV usually limits control and makes the singing side of the setup harder to manage well.
Before your next karaoke night, run one clean test from source to speakers and one full song with the microphones live.
A simple pre-party routine catches most problems before guests ever notice them.
Karaoke Setup Checklist Before a Party


